Showing posts with label ranch style house. Show all posts

Monday, September 17, 2012

An Oldie

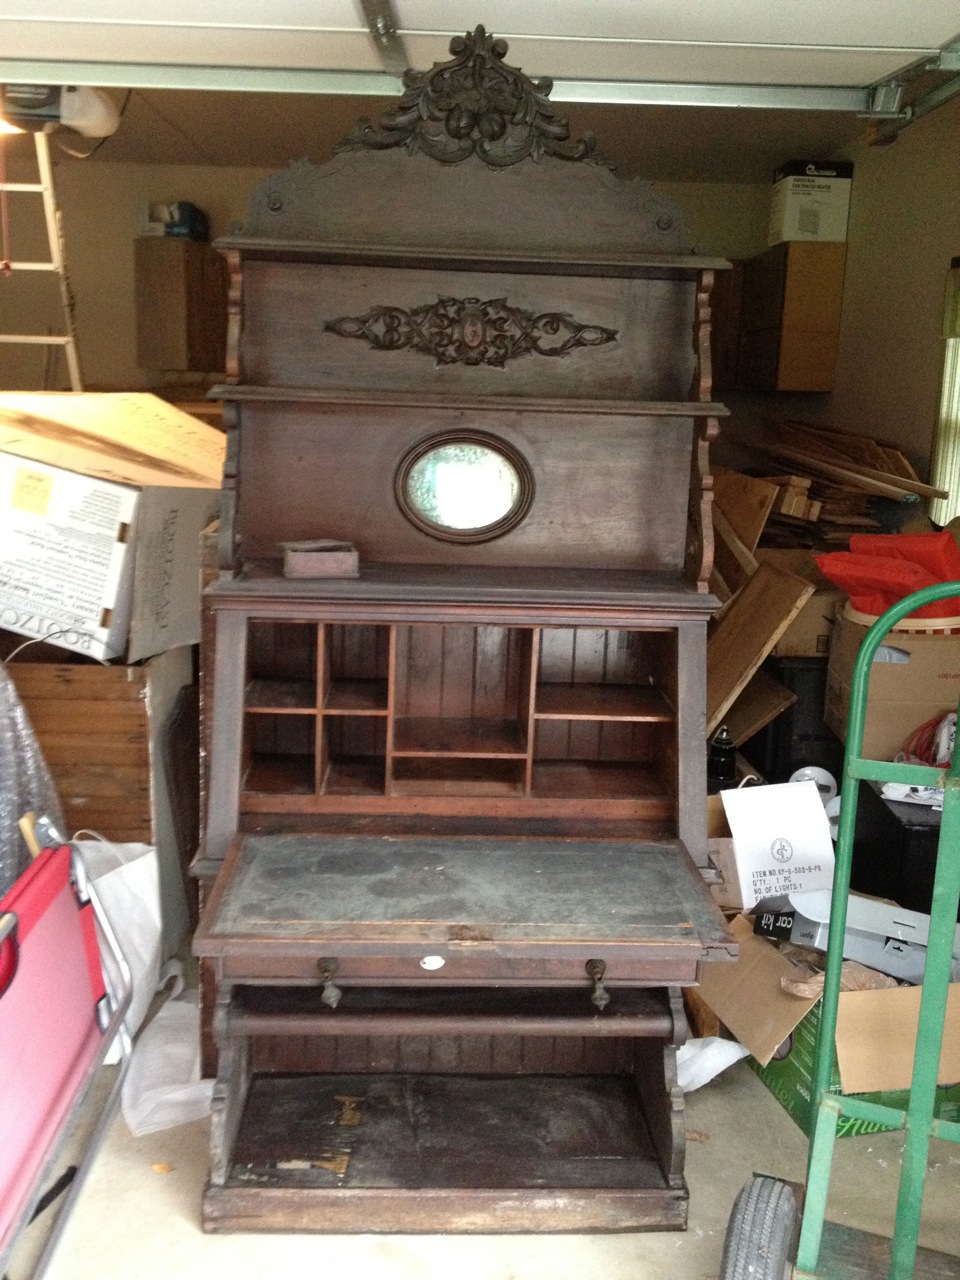
Today my Dad comes rolling in in his truck honking the horn....IN THE MIDDLE OF THE RAIN!!!  I look out and start running.  He had been down at my Aunt & Uncle's and picked up an old cabinet that had belonged to my Great Uncle...and we're pretty sure it was built by either his Dad or his Grandpa!  So I had to get out out there quick and help him unload this piece of family history!

It's got a few things that could stand to be repaired...but that will have to be done in time :)

It also came with this little box that has some detail pieces off of the big piece.
How cute is that box?  and WHY do I love it so much?
Who knows...maybe my Great or Great Great Grandpa built that little box too!

So at the end of this nasty rainy day...I happened to catch this shot with my phone of the humid mist settling over the hills.  Kinda cool.

Sunday, September 16, 2012

A Sticky Mess

 We got all of the old window jambs pulled out from the sunroom now...talk about a mess!

They used double stick tape....great for creating a seal...

but also great for making a mess!!

All of the new jambs are finished and just waiting to be put in!

See that sticky adhesive mess?  I spent about 8 hours with an adhesive remover and a razor blade just scraping that off.  Bleh!  Just an FYI...I don't recommend using Goof Off for this...the fumes were a bit loud in my opinion :)  FINALLY I think we can install the new jambs though!  Whew!
 

Saturday, September 15, 2012

Laundry & Pantry Cabinets

Finally...a room that's actually looking like something!  Today we installed the Laundry and Pantry cabinets in the clutter room!  I still need to paint them white, but that doesn't have to happen now, lol.  This is the room that we were able to purchase a display and then add a few more cabinets to make something that will work....and I think it will work WONDERFULLY!  Now we just need tile, grout, lot of paint and trim :)  Done in no time right?  lol.

This is the laundry side....the washer & dryer will stack on the left (which we still need to pick out)  And then a sink in the middle....and that giant cabinet on the right is for the laundry baskets!!!  Pretty sure that's my most favorite thing in this room!  I'm going to love not having to look at the dirty clothes!

And here is the pantry side.  Pull outs are in the tall cabinet...then lots of regular storage for other stuff!  Awesome!  I can't wait to start organizing!

Sunday, September 9, 2012

More Sunroom Fun

Finally I started to paint the sunroom.  Because the pine is so knotty, I decided to use some B-I-N Primer first to try and block out those ugly yellow spots! 


You can see that the primer didn't really do a great job of covering, but it does appear to have blocked the knots!  I guess only time will tell though.

Had to give the ceiling a fresh coat of paint too...it looked so dirty.  Don't you love the saran wrap on my head?  Hey...it's what you do when you don't have a hat  :)

Finally getting somewhere with the paint.

It only took 3 days, 1 coat of primer and 3 coats of paint!!!  Now we need to build new window jambs.  The new wood walls are much thicker than the drywall & paneling that was out there before.

Sunday, August 26, 2012

Vanity Repair!

You remember that old dresser that I bought to turn into a vanity....well...I worked today on removing the "gunk" on that had built up under the mirror over the years.  Was hoping that I could just blend the new finish into the old....but I'm not so sure that's going to be possible now.  Imagine that, lol! 


I sure thought the sink hole I cut was a little more even, lol.

Here's a reminder of what we started with:
We're going to use the mirror in the 1/2 bath.  See where the mirror frame is though...that's where all of the old finish was really thick.  We'll see how it turns out.


Thursday, August 23, 2012

A Flooring Filled Day

So I'm still not entirely sold on the flooring for the laundry/mudroom/1/2 bath.  Ugh!  There's just something about it.  So today I went to town...ran errands...visited Lowes & Home Depot (imagine that) and then went on to do some shopping for some different tile.  While I didn't have any luck (so I guess I'm using what we've already got) I did find a great deal on some Travertine.  I've got to call them and tell them that I want it....hopefully they've still got it.  I think it will work perfectly in our basement bathroom.  I'm a little concerned that travertine is just too fancy for a basement bath...but since our actual family room is down there I think it will be ok.


I think it'll be pretty, and work really nicely with the vintage cabinet & sink that we're using for our vanity.

After I got back from errands and Kade got home from work we went straight to grouting.  I hope it turns out ok.  I get myself worked up about every project that we do, lol.

I think Bisque was the grout color that we chose.

Done...cleaned up...and ready to install a toilet!!!
Let's make that a priority!!  :)

Kade sat in a couple of the cabinets for the mudroom while I was grouting.  I'm going to love this.  He said tonight that this was what he was most excited about!  That makes me smile!

Before we stopped for the evening I had Kade hook up an option for the "over the island" lights...the other one he had to just hold up there...which one do you like best?  I think I like the big one.  I've got 2 other options for that spot...but these are the ones I've wanted from the get go...so they're probably going to win out in the end  :)

Wednesday, August 8, 2012

Prep Work

Tonight we didn't get much done (seems we have a lot of evenings like that!)  We did get the Ditra cut for the bathroom floor though.  Tomorrow night we'll get that put down.  This stuff is so weird.  It's a tile underlayment, you spread out mortar, push this down into it, then you tile right over the top...just like you'd normally lay the tile.  Now I'm nervous about putting down the floor tile, lol.

There's Kade cutting the vent hole in the Ditra.

You just lay it edge to edge...and tile...you don't even have to wait for the mortar to dry underneath.

A little something for Bran.

Tomorrow the hardwood floor is suppose to be delivered...YEAH!!  Can't wait to get that installed (and yes, we're planning on installing that too, WHAT is wrong with us??)

Tuesday, August 7, 2012

MORE Tub Surround

Seriously...we thought we'd get to finish the tub surround today...but no such luck.  We were SOOOOO close though.  I got the tiles all cleaned up though...got the extra mortar out from in between, etc.  What a mess I made!

Look at how serious I am, lol.  Very determined.

The ALMOST finished product.

Seriously....3 Bullnose tiles short....so we didn't put the rest of it up.  We'll make ANOTHER trip to Lowes for tile and then get it finished up when we have everything we need.  Who figured up our supplies list??  I don't THINK it was me  ;)

Sunday, August 5, 2012

More Tub Surround

We worked some more on the tub surround today.  Why is this taking so long??  Are we the slowest tilers EVER??  (I'm thinking the answer to that is YES!)


I had to have Kade help me with the "up high" areas...my arms were already tired, plus I can barely reach that high, lol.  I'm not even short...so maybe we made it too tall?

Look, I do exist...and I do actually work!
Had to have Kade snap a pic today as he was sitting in the hallway waiting on me to tell him what I needed.

Still not done...but close...It got a little too late so we decided to save the last wall for another day.

Here's a little closeup of the pattern...what you can't tell is that the dark tile is actually brown glass.  I just LOVE how this is turning out!

Saturday, August 4, 2012

Tiled Tub Surround...the beginning

Started the tub surround today!  Talk about nerve wracking...lol...why do I let everything stress me out soooo badly??  I guess it's because I just don't want to screw it up.  I think it looks pretty good so far.  This is the first tub surround that I've tiled, so it's a new experience for me.  I did do the backsplash in our current kitchen though...I guess it's KIND of similar...just a whole lot smaller!!

 Had to stop at this point because I really felt like the mortar was a bit dry.  I'll work on it some more tomorrow when we've got more time.  I think I might be able to handle this  :)

Wednesday, August 1, 2012

More RedGard

Today I finished the RedGard for the tub surround (that means we're THAT much closer to tiling, yikes!)  I'm not gonna lie...the stuff is kinda stinky...but it's not terrible bad.

1st REAL coat at full strength...

After it dried...RED

I actually did 3 coats at full strenght...I figured if 2 was good, then 3 was better, lol.  Hopefully that is true with RedGard.  I just didn't feel like the coating was as thick as it should be.  I applied the full strength coats with a 3/4" nap roller.  While all this was drying I decided it was time to cut the whole in the old dresser for the sink.

That looks just right!  I left a pretty good edge to support the sink bowl...didn't want to take any chances.  Now I've just got to fix where the old finish is all gummed up where the old mirror was.  Mabye later  :)

Tuesday, July 31, 2012

Tub Time?

So when we made the decision to tile the tub surround instead of just using a "regular" surround, I knew that we were going to have to do LOTS of steps.  Let's be honest....who REALLY likes to do lots of steps??  No matter how bad we want to cheap out or take the quick route, we're not going to do it.  That's just not how we roll!  So today I began the chore of waterproofing the HardiBacker with RedGard.  It's this crazy stuff you roll or brush on and when it dries it makes like a rubber coating.  So weird!  :)  But I can see how it would work.

Here's how it looks with the "primer" coat - the RedGard thinned down with water.
That's all I got done for today on that...have to let it dry a bit...so tomorrow I will do the remaining coats.  So next we worked on lighting.  I got these schoolhouse lights that I just love from Lowes, only problem is that for some reason they don't hold tight to the ceiling...so they BARELY cover the light box!  How can we fix this??  Hmmmm....

Isn't it cute?  These lights are above the windows in the kitchen.

Here's how it looks "modified" 
We just made something like a plate to cover more at the base.

There it is...our "fix".  I just took a plain light box cover...plastic...like $2.15, Kade cut holes in them while I was working on the RedGard for the tub.... and then I took the very same spray paint that I used for the closet lights and gave them a quick coat.  The hole in the center didn't even have to be straight because the screw holes are what keeps it centered.  (although anyone that REALLY knows me knows that that being off center still drives me crazy, lol)

There it is again...all fixed....you can't even tell we did anything!
 Now...I can't wait to get the Kitchen cabinets in and see how cute these lights REALLY look :)

I'm going to finish up the RedGard tomorrow while Kade's at work, then we'll see what other trouble I can get in to, lol


Thursday, July 26, 2012

My Favorite Wall

Finally...we got to work on the Dining Room/Stairway wall! (I was getting so sick of seeing those studs with nothing on them, lol)  This is one of my favorite things so far.  Oh..and the plan is to paint this one too  :)


 So...what do you think?  I think I LOVE it!

Do you see anything in this picture?  I SEE SPRINKLES :)
This is the FIRST time we've seen anything that even resembles rain in the last few months!  It's been soooo HOT and soooo DRY this summer.  Even I am praying for rain..and I am NOT a fan of rain!

Not a lot of waste so far...I'm doing pretty good!

My work station :)

DONE!
Well...at least with the part that's above floor level.
Kade still has to pull some wiring in the basement before we can finish down the stairs.

Tuesday, July 24, 2012

Moving Right Along

Ok...just so you know...I AM working on this project....it just so happens that there's nobody there to take a picture of ME working :)  Not sure what Dad would do if I handed him my phone and said "here, take a picture" lol.  I'm doing all of the cutting and some of the measuring (when Dad's not paying attention, lol)  We made some pretty good progress again...got one wall done yesterday after I worked on signs...then got the other two done today.  Just need to cut pieces to finish the bottom (which will all be behind the trim)


I think Dad really likes to use the nail gun  :)

Did I mention it was HOT again, lol.  106 Outside...and it's amazing how hot 82 feels with no air circulation!

There it is...all finished up

Well...not entirely finished...I still have to prime it and paint it

I know that some people HATE that idea...but trust me...it's going to look good!

Oh...still have to get our french doors for here!